The instruction contains the following points:
Ⅰ. S19 Hydro Server Check before Use
Ⅱ. Basic Descriptions of S19 Hydro Server
Ⅲ. Use and Setup of S19 Hydro Server
Ⅰ. S19 Hydro Server Check Before Use
1. The Inspection of New Machine Signing
a、When signing for the new machine, please check whether the appearance of the package is damaged. If there it is damaged, please take the photo and contact customer service for processing immediately;
b、After unpacking, please check whether the server case is deformed, and whether the fan and connecting line are damaged. If there is any damage, please take the photo and contact customer service for processing immediately;
c、Check whether there is any abnormal sound of the server, if there is any abnormal sound, please contact customer service immediately;
2. Cautions
a、The server should be connected to a router or switch without POE function;
b、The server can only be connected to the router or switch by wire;
c、The recommended ambient temperature is 25~30℃;
d、The recommended ambient humidity is lower than 65%RH;
e、Pay attention to dust and foreign objects, so as not to corrode the computing board or affect the heat dissipation of the server;
f、It is recommended to use Google kernel browser or Firefox browser to browse the server background;
*Note: It is strictly forbidden to plug and unplug the power cord and signal line. The AC side of the server power supply must be reliably grounded.
Ⅱ. Basic Descriptions of S19 Hydro Server
1. Overview
The S19 Hydro server is one of the Bitmain’s newest versions in the 19 hydro server series. Power supply APW11 is part of S19 Hydro server. All S19 Hydro servers are tested and configured prior to shipping to ensure easy set up.
Caution:
1. Please refer to the layout above to place your goods in usage in case of any damage.
2. DO NOT remove any screws and cables tied on the product.
3. Please note that the actual server shall prevail.
4. There must be an external specific Surge Protection device complying with IEC/EN 61643-11 either in front of the power supply or outside the end system (in a separate distribution box or as part of the building installation).
5. Do not plug or remove the device when it is powered on.
6. The external of the power supply shall have a disconnecting device, which can disconnect L1&L2&L3 simultaneously.
7. The S19 Hydro server shall be used simultaneously with the ANTSPACE HK3. Please click here for more details of ANTSPACE HK3.
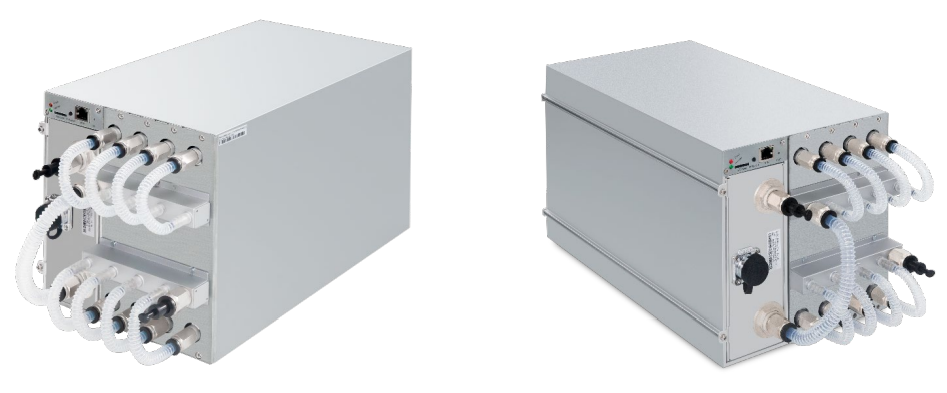
2. S19 Hydro Server Components
The main components and controller front panel of S19 Hydro servers are shown in the following figure:

APW11 Power Supply:
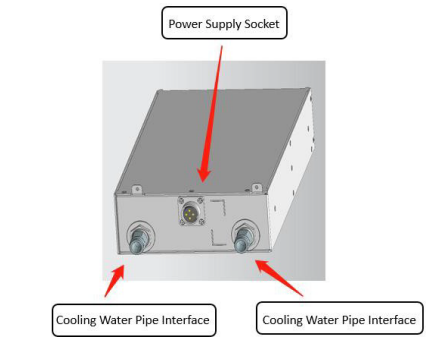
*Note: Power supply APW11 is part of S19 Hydro server. For detailed parameters, please refer to the specifications below.
Ⅲ. Use and Setup of S19 Hydro Server
To set up the server:
The file IPReporter.zip is supported by Microsoft Windows only.
1. Go to the following site:
https://shop.bitmain.com/support.htm?pid=00720160906053730999PVD2K0vz0693
2. Download the following file: IPReporter.zip.
3. Extract the file.
The default DHCP network protocol distributes IP addresses automatically.
4. Right-click IPReporter.exe and run it as Administrator.
5. Select one of the following options:
■ Shelf, Step, Position – suitable for farm servers to mark the location of the servers.
■ Default – suitable for home servers.
6. Click Start.
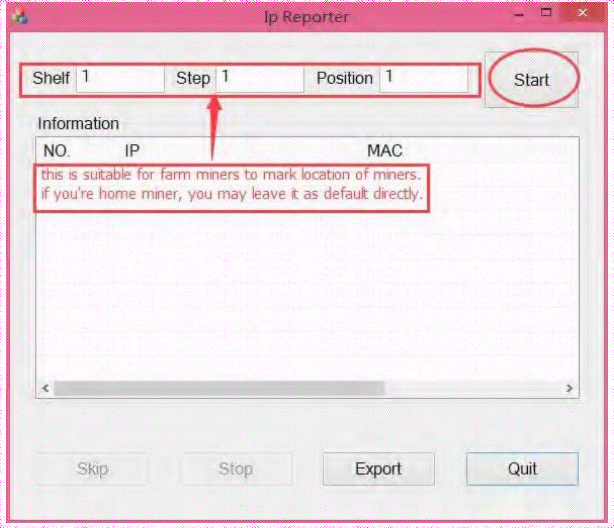
7. On the controller board, click the IP Report button. Hold it down until it beeps (about 5 seconds).
The IP address will be displayed in a window on your computer screen.
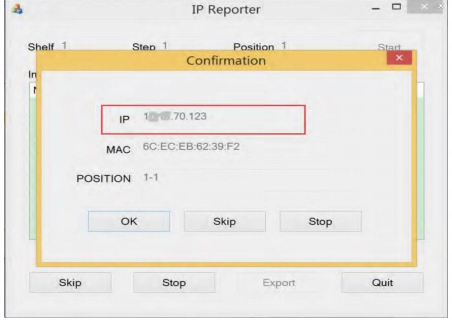
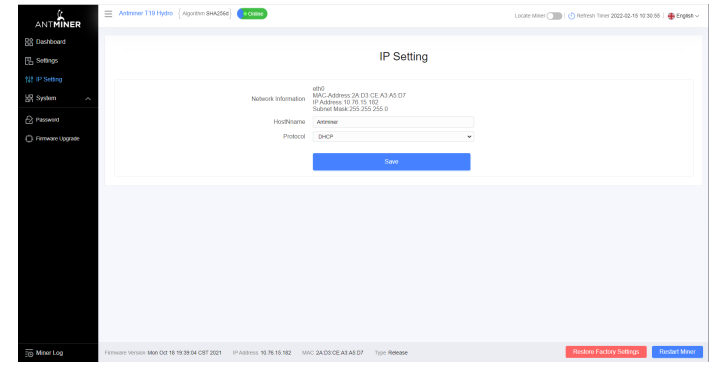
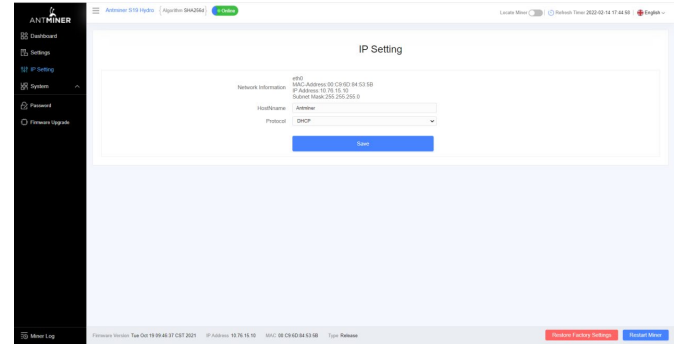
8. In your web browser, enter the IP address provided.
9. Proceed to login using root for both the username and password.
10. In the Protocol section, you can assign a Static IP address (optional).
11. Enter the IP address, Subnet mask, gateway and DNS Server.
12. Click “Save”.
13. Click https://support.bitmain.com/hc/en-us/articles/360018950053 to learn more about gateway and DNS Server.

To configure the server:
1. Click Settings as below.
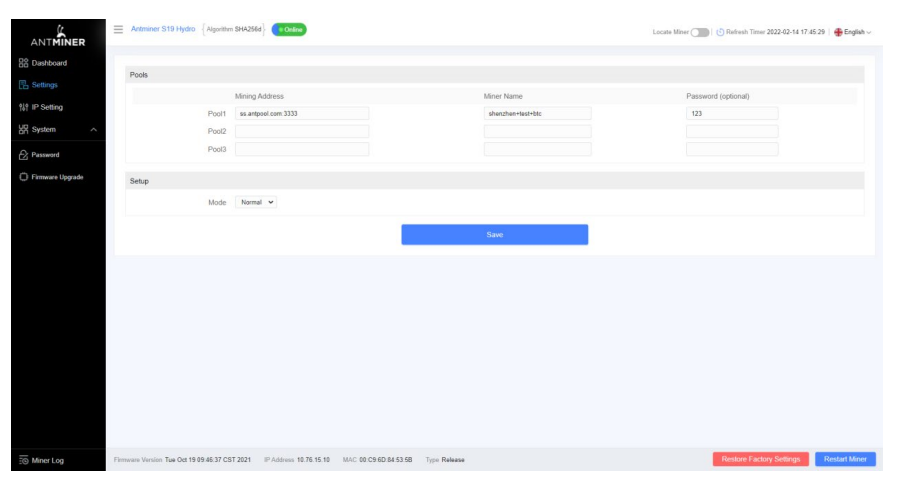
2. Set the options according to the following table.
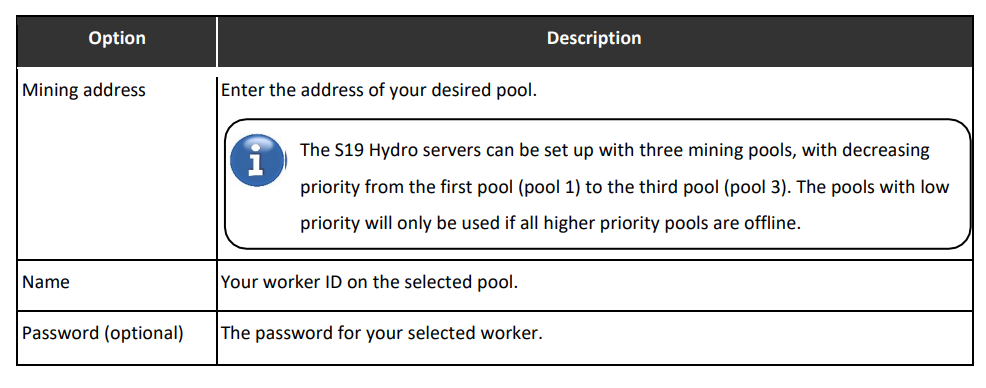
3. Click Save after the configuration.
Monitoring Your Server:
To check the operating status of your server (taking S19 hydro 151.5T as an example):
1. Click dashboard marked below to check the server status.
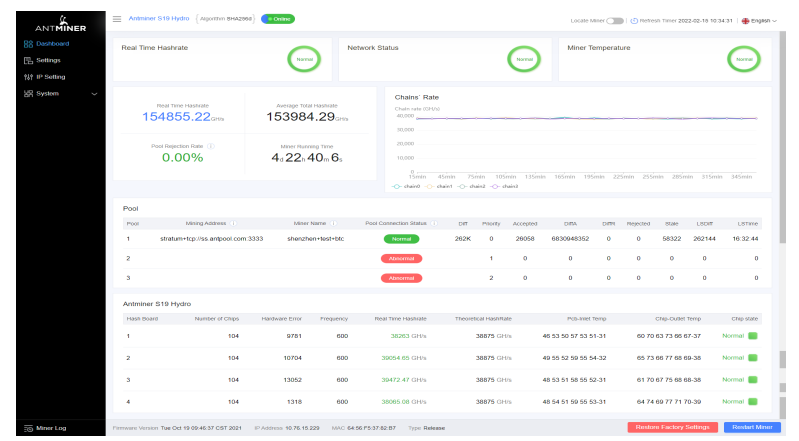
*Note: The frequency of S19 Hydro server is fixed with the value 600 MHz. Firmware will stop running when the Temp (PCB) reaches to 80℃ or the water temperature is either greater than 65℃ or lower than 20℃,there will be an error message “Fatal Error: Temperature is too high!” shown on the Bottom of the Kernel logpage.
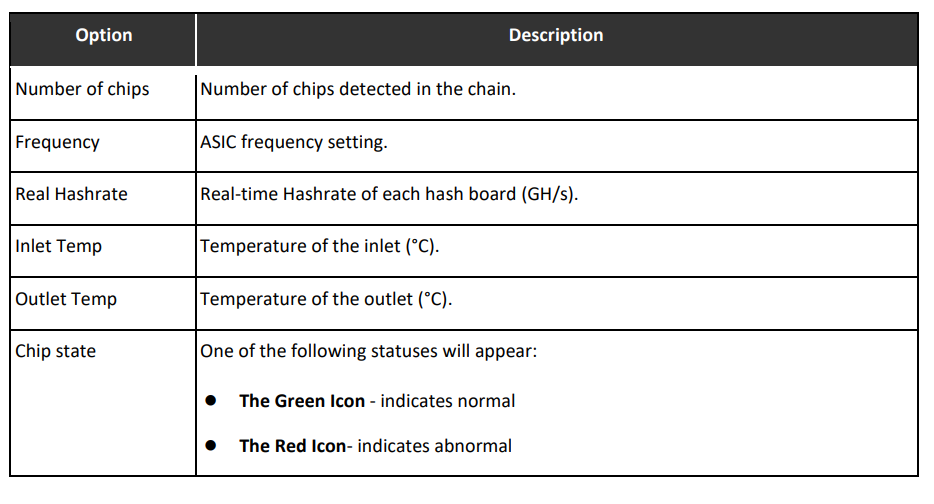
2. Monitor your server according to the descriptions in the following table:
Administering Your Server, to check your firmware version:
1. Enter the backstage of your server, find the firmware version on the bottom.
2. File System Version displays the date of the firmware your server use. In the example below, the server is using firmware version 20211019.
Upgrading Your System, to upgrade the server’sfirmware:
*Note: Make sure that the S19 Hydro server remains powered during the upgrade process. If power fails before the upgrade is completed, you will need to return it to Bitmain for repair.
1. In System, click Firmware Upgrade.
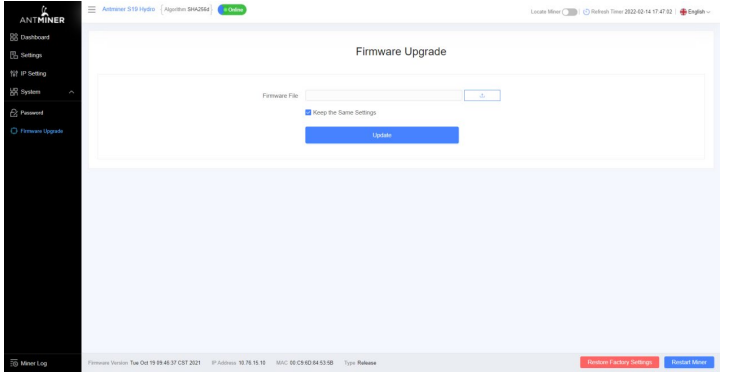
2. For Keep Settings:
■ Select “keep settings” to keep your current settings (default).
■ Unselect “keep settings” to reset the server to default settings.
3. Click the ![]() button and navigate to the upgrade file. Select the upgrade file, then click Update.
button and navigate to the upgrade file. Select the upgrade file, then click Update.
4. When the upgrade is completed, restart the server and it will turn to the setting page.
5. Click one of the following options:
■ Reboot - to restart the server with the new firmware.
■ Go Back - to continue mining with the current firmware. The server will load the new firmware next time it is restarted.
Modifying Your Password, to change your login password:
1. In System, click the Password tab.
2. Set your new password, then click Save.

Restoring Initial Settings, to restore your initial settings
1. Turn on the server and let it run for 5 minutes.
2. On the control panel, press and hold the Reset button for 10 seconds.
*Note: Resetting your server will reboot it and restore its default settings. The red LED will automatically flash once every 15 seconds if the reset is operated successfully.
Should you have any inquiries, feel free to contact us for assistance.
| Contact us > |
Comments
0 comments
Please sign in to leave a comment.